Serenity Australasian Blog Hop
Elegant and classy, the Serenity Collection is a joy to work with. The soft blues teamed with toffee and cream tones are easy on the eye and work with a range of photo themes. Add in the co-ordinated Cricut collection and it is divine.
Make a Scrapbook Layout for a Frame
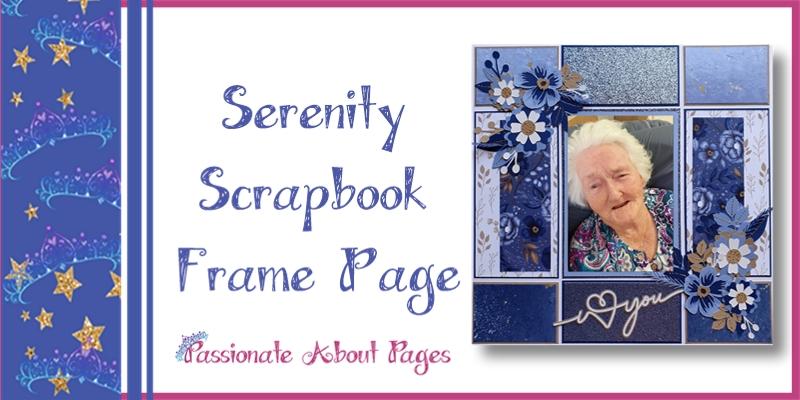
When you capture a smile and a twinkling eye that shows the woman your mum used to be before Alzheimer’s, it’s worth making a super special layout for a 12 x 12 frame on the wall.
You will want the Serenity Paper pack, co-ordinating cardstock, PML cards and Cricut collection for this project.
Begin in the centre of the page
There’s no need for complicated measurements. Start with a 4” x 6” photo. Double mat it and centre on the base page. My glitter piece is 4 5/8” x 6 5/8” but you could have a smaller gap between the photo and the first mount by cutting at 4 ½” x 6 ½”
Make the top and bottom centre panels the same width as the photo mount. Make the left and right centre panels the same height as the photo mount. Cut the top layers of each panel 1/8” smaller than the base of the panel.
Make 4 corner pieces to match the dimensions of your outer panels. You want definite horizontal and vertical lines dividing your page into 9 segments.
Cut the Sapphire floral PML card in half lengthways and position on left and right panels.
Cut your Cricut Embellishments
The serenity Cricut collection includes all these gorgeous layered elements. You can manipulate them in Cricut Design space to change size, ungroup layers and hide some of the contour lines.
My preferred adhesive for these small elements is the Dual Tip Multi-bond Glue
For this project I used:
6 petal flowers 2” and 1 ½” high
Decorative flower is 2” high.
Resize the leaves and berries sprig so they are proportional to the flower. Hide contour lines on the leaves
I love you is 2” x 5 ½”. Use Micro Glue dots to attach this to the Glitter paper.
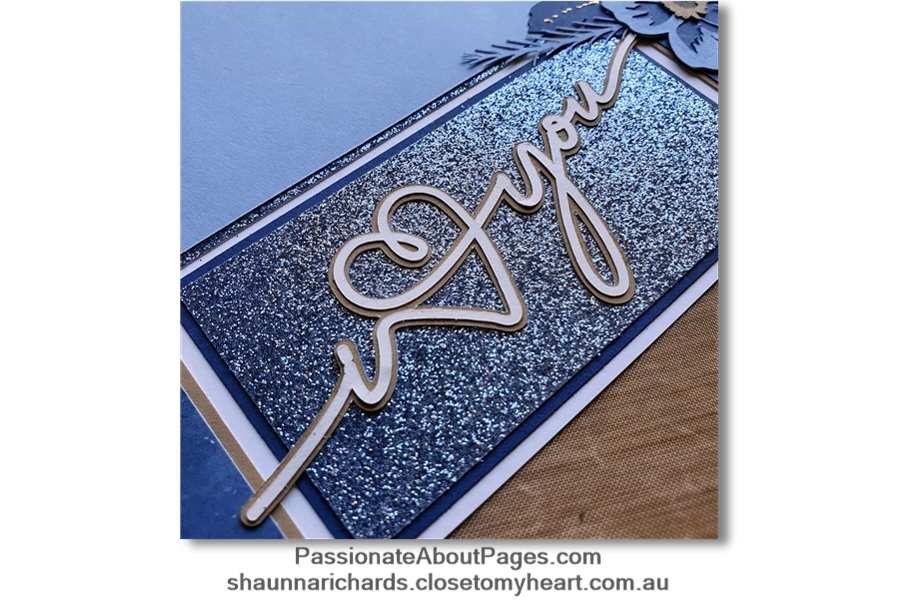
Add Liquid Pearls to emulate heat embossing
Adding the Rose Gold liquid pearls in dashed lines on the leaves and as dots on the flower centres gives the illusion of heat embossing without the hassle!
Brush the Blue Belle Shimmer Brush over some flower petals to create a shine.
What to do if you don’t own a Cricut!
If you don’t own a Cricut, order the paper pack that comes with stickers and use those. The look of the flower clusters will be similar but bolder.
Colour the white borders around the stickers with Ice Grey TriBlend Marker or Bluebell Shimmer Brush to help them blend with the papers.
Happy Scrapping,
Shaunna
CTMH products used in this project (all retired)
X7263B Serenity Paper Pack
X7263C Serenity Coordinating Cardstock (includes 2 sheets glitter paper)
X7263D Serenity Picture My life Cards
Z3891 Cricut Serenity Collection
Z3793 Rose Gold Liquid Pearls
Z3809 Blue Belle Shimmer Brush
Z3441 Dual Tip Multi-bond Glue
Z3372 Adhesive Runner
Z2089 Micro Dots
Categories
- Cards (64)
- Stamping (109)
- Thin Cuts (49)
- Photo Organisation (1)
- Album Planning (1)
- Scrapbook Layouts (244)
- Stamp of the Month (91)
- Paper Craft (11)
- Paper Fundamentals (17)
- Simple pages (2)
- Washi Tape (8)
- Flip Flaps (11)
- Tools (16)
- PML (4)
- Organisers (3)
- stickers (6)
- Albums (7)
- Workshops (3)
- watercolour pencils (2)
- Watercolour paints (2)
- Workshops Your Way (34)
- Special Offers (39)
- Organise Your Photos (3)
- Craft with Heart (3)
- Storytelling (6)
- VIP (3)
- Shimmer Brush (1)
- Glitter Paper (1)
- Paper Candy (2)
- Interactive Cards (1)
- Metallic Markers (1)
- Tell Your Story (2)
- Distress Oxides (2)
- Nearly Bare Pages (1)
- Wedding (2)
- Stencils (1)
- Free download (2)
- Organisation (1)
- Same but Different (1)
6 comments
Leave a comment